
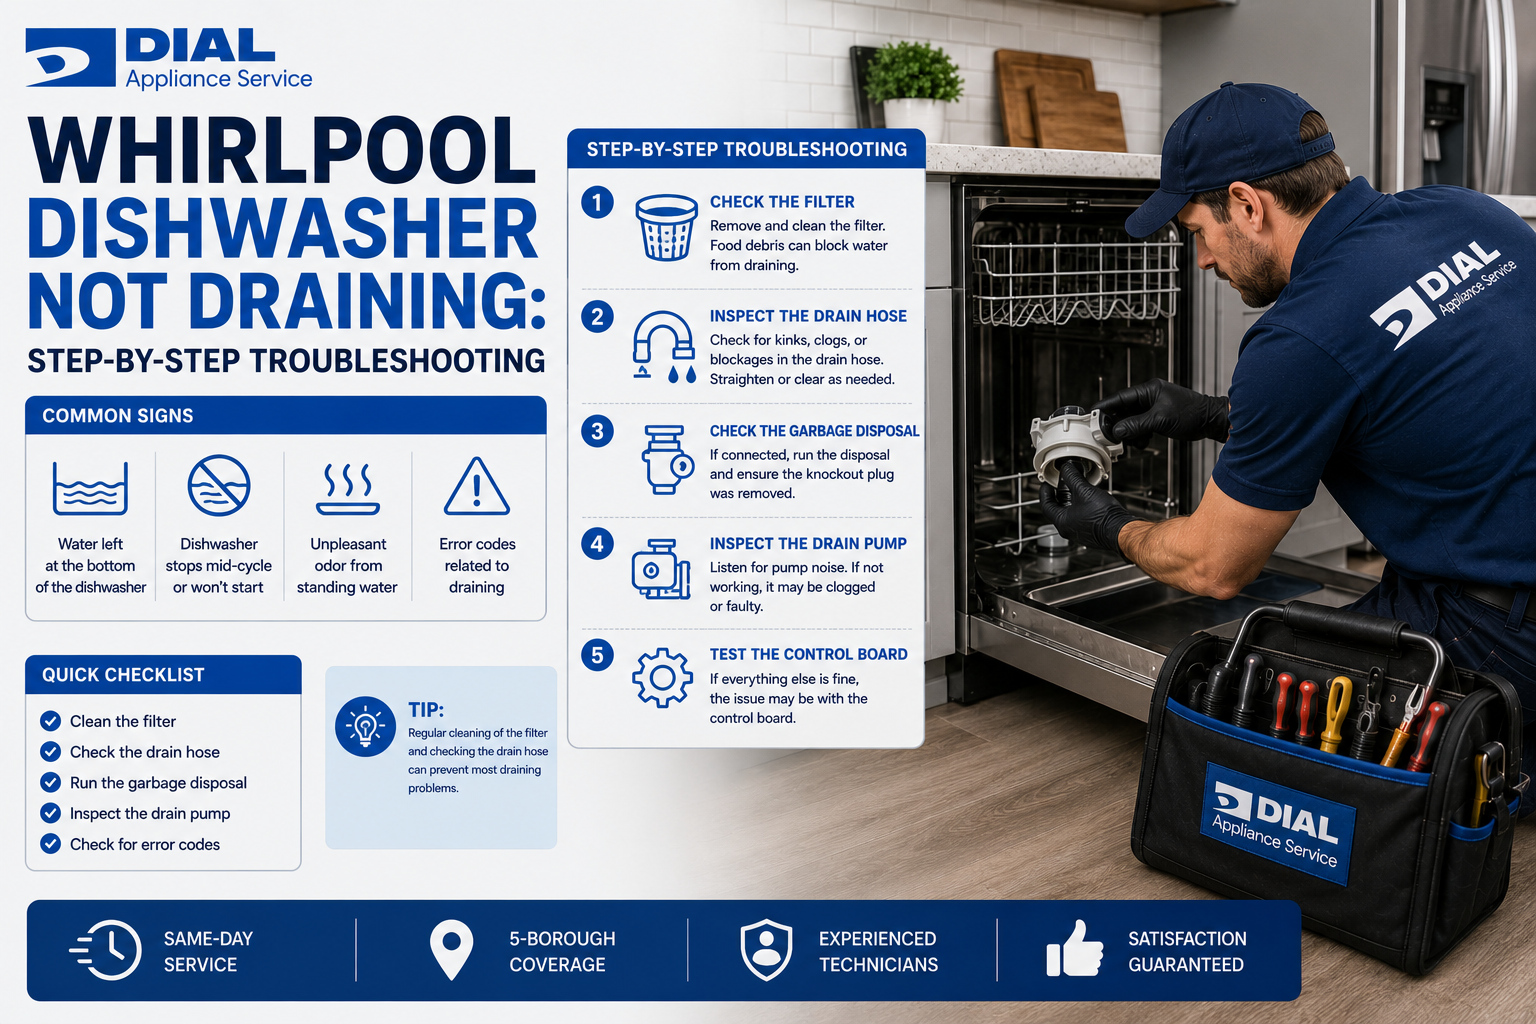
A Whirlpool dishwasher is a reliable appliance that simplifies the task of cleaning dishes, but like any machine, it can encounter issues over time. One of the most common problems faced by users is the dishwasher not draining properly. This can lead to standing water at the bottom of the appliance, which not only creates an unpleasant odor but can also lead to further complications if left unaddressed. Understanding the reasons behind this issue is crucial for homeowners who rely on their dishwashers for daily convenience.
When a Whirlpool dishwasher fails to drain, it can be frustrating, especially after a long day of cooking and entertaining. Fortunately, many of the causes behind this problem are relatively easy to diagnose and fix. In this article, we will explore various potential issues that could be preventing your dishwasher from draining effectively. By following these steps, you can troubleshoot the problem and restore your appliance to its optimal functioning state.
Check for Clogs in the Drainage System
The first step in addressing a drainage issue with your Whirlpool dishwasher is to check for clogs in the drainage system. Over time, food particles, grease, and other debris can accumulate in the drainage system, leading to blockages that prevent water from flowing out of the appliance. To begin this process, you should remove the bottom rack of the dishwasher and inspect the area around the drain for any visible obstructions.
If you notice any debris or buildup, it’s essential to clean it out thoroughly. A simple solution is to use a damp cloth or sponge to wipe away any residue. Additionally, you may want to use a small brush or a toothpick to dislodge any stubborn particles that may be stuck in the drain. Regular maintenance of your dishwasher’s drainage system can help prevent clogs from forming in the first place, ensuring that your appliance continues to function smoothly.
Inspect the Drain Hose for Blockages
Another common culprit behind a Whirlpool dishwasher not draining is a blocked drain hose. The drain hose is responsible for transporting wastewater from the dishwasher to your home’s plumbing system. If this hose becomes kinked, clogged, or damaged, it can impede the flow of water and result in drainage issues. To inspect the drain hose, you will need to locate it at the back of the dishwasher and follow it to where it connects to your home’s plumbing.
Carefully examine the hose for any signs of kinks or bends that could restrict water flow. If you find any obstructions, gently straighten out the hose to allow for proper drainage. Additionally, you should check for any blockages within the hose itself. Disconnecting the hose from both ends can help you inspect it more thoroughly. If you discover any buildup or debris inside the hose, use a long brush or a flexible cleaning tool to remove it. Ensuring that your drain hose is clear and free from obstructions is vital for maintaining optimal drainage in your Whirlpool dishwasher.
Examine the Dishwasher Filter for Debris
The filter in your Whirlpool dishwasher plays a crucial role in preventing food particles and debris from entering the drainage system. Over time, this filter can become clogged with residue, leading to drainage problems. To address this issue, you should locate and remove the filter from your dishwasher for inspection and cleaning. Typically, the filter is located at the bottom of the appliance and can be easily accessed by removing the bottom rack.
Once you have removed the filter, rinse it under warm water to dislodge any trapped food particles or debris. You may also want to use a soft brush to scrub away any stubborn buildup that may be present. After cleaning, ensure that the filter is completely dry before reinserting it into the dishwasher. Regularly checking and cleaning your dishwasher filter can help prevent drainage issues and ensure that your appliance operates efficiently.
Test the Drain Pump for Malfunction
If you have checked for clogs in the drainage system, inspected the drain hose, and examined the filter without finding any issues, it may be time to test the drain pump for malfunction. The drain pump is responsible for expelling water from the dishwasher during the drain cycle. If this component fails or becomes damaged, it can prevent water from draining properly.
To test the drain pump, you will need to access it by removing the lower spray arm and cover plate inside the dishwasher. Once you have access to the pump, listen for any unusual noises when the dishwasher attempts to drain. If you hear a humming sound but no water is being expelled, this could indicate that the pump is jammed or malfunctioning. In some cases, you may need to replace the pump entirely if it is found to be defective.
Ensure Proper Installation of the Dishwasher
Improper installation of your Whirlpool dishwasher can also lead to drainage issues. If the appliance is not level or if it has been installed incorrectly, it may not function as intended. To ensure proper installation, check that your dishwasher is level by using a bubble level tool. If you find that it is not level, adjust the feet of the appliance accordingly until it sits evenly on the floor.
Additionally, verify that all connections are secure and that there are no leaks present in the plumbing or electrical connections. If you suspect that your dishwasher was not installed correctly or if you are unsure about its installation status, consider consulting with a professional technician who can assess and rectify any installation issues.
Clean the Air Gap to Prevent Clogs
An air gap is an important component of your dishwasher’s drainage system that helps prevent backflow of wastewater into the appliance. If this air gap becomes clogged with debris or buildup, it can hinder proper drainage and lead to standing water in your dishwasher. To clean the air gap, locate it on your kitchen sink or countertop—typically near the faucet.
Remove any visible debris from around the air gap and unscrew its cap if possible for a more thorough cleaning. Use warm soapy water and a small brush to clean inside the air gap and remove any buildup that may be present. After cleaning, reassemble everything and run a short cycle on your dishwasher to ensure that water drains properly.
Check the Garbage Disposal for Clogs
If your Whirlpool dishwasher is connected to a garbage disposal unit, clogs within this appliance can also affect drainage. When food waste accumulates in the garbage disposal, it can create blockages that prevent water from flowing freely into your home’s plumbing system. To check for clogs in your garbage disposal, start by turning off power to the unit for safety.
Next, inspect the disposal for any visible obstructions or buildup that may be causing drainage issues. You can use a flashlight to look inside and see if there are any large food particles stuck within. If necessary, use tongs or pliers to remove any debris carefully. After clearing out any clogs, run cold water through the disposal while turning it on briefly to ensure that everything is functioning correctly.
Inspect the Drain Valve for Blockages
The drain valve in your Whirlpool dishwasher plays a critical role in controlling water flow during drainage cycles. If this valve becomes blocked or stuck due to debris or mineral buildup, it can prevent water from draining properly. To inspect the drain valve, you will need to access it by removing panels or covers on your dishwasher.
Once you have located the drain valve, check for any visible obstructions or signs of damage. If you notice any buildup around the valve, clean it thoroughly using warm soapy water and a soft brush. Ensure that the valve opens and closes freely without any resistance; if it appears stuck or damaged, consider replacing it with a new one.
Verify the Proper Functioning of the Float Switch
The float switch in your Whirlpool dishwasher is designed to monitor water levels within the appliance and signal when it’s time to drain excess water. If this component malfunctions or becomes stuck due to debris buildup, it may fail to activate properly during drainage cycles. To verify its proper functioning, locate the float switch inside your dishwasher—usually found near the bottom.
Check for any obstructions around the float switch that could prevent it from moving freely up and down as intended. Gently lift and lower the float manually to see if it moves without resistance; if not, clean around it thoroughly before testing again. If you suspect that there is an issue with its functionality after cleaning, consider consulting with a professional technician who can diagnose and repair any problems.
Consider Calling a Professional for Assistance
If you have followed all these troubleshooting steps and still find that your Whirlpool dishwasher is not draining properly, it may be time to call in a professional for assistance. While many common issues can be resolved through DIY methods, some problems may require specialized knowledge or tools that only an experienced technician possesses.
A professional appliance repair technician will have access to diagnostic equipment that can pinpoint underlying issues more accurately than basic troubleshooting methods alone. They can also provide valuable insights into maintenance practices that can help prevent future drainage problems from occurring in your dishwasher.
In conclusion, addressing drainage issues with your Whirlpool dishwasher requires careful inspection and troubleshooting of various components within the appliance’s system. By following these steps—checking for clogs in both drainage systems and hoses; examining filters; testing pumps; ensuring proper installation; cleaning air gaps; inspecting garbage disposals; checking valves; verifying float switches—you can often resolve these problems on your own without needing professional help.
However, if all else fails or if you feel uncertain about tackling repairs yourself—don’t hesitate! Calling an expert ensures peace of mind knowing that your appliance will be restored efficiently so you can get back to enjoying its convenience once again!
Contact Dial Appliance Service today to schedule your appointment and experience why we’re New York City’s most trusted choice for “Appliance Repair.” Schedule Your Appliance Repair Service Now at (718) 368-1512 or Contact Us Now!